maestro

MCP.Pizza Chef: its-maestro-baby

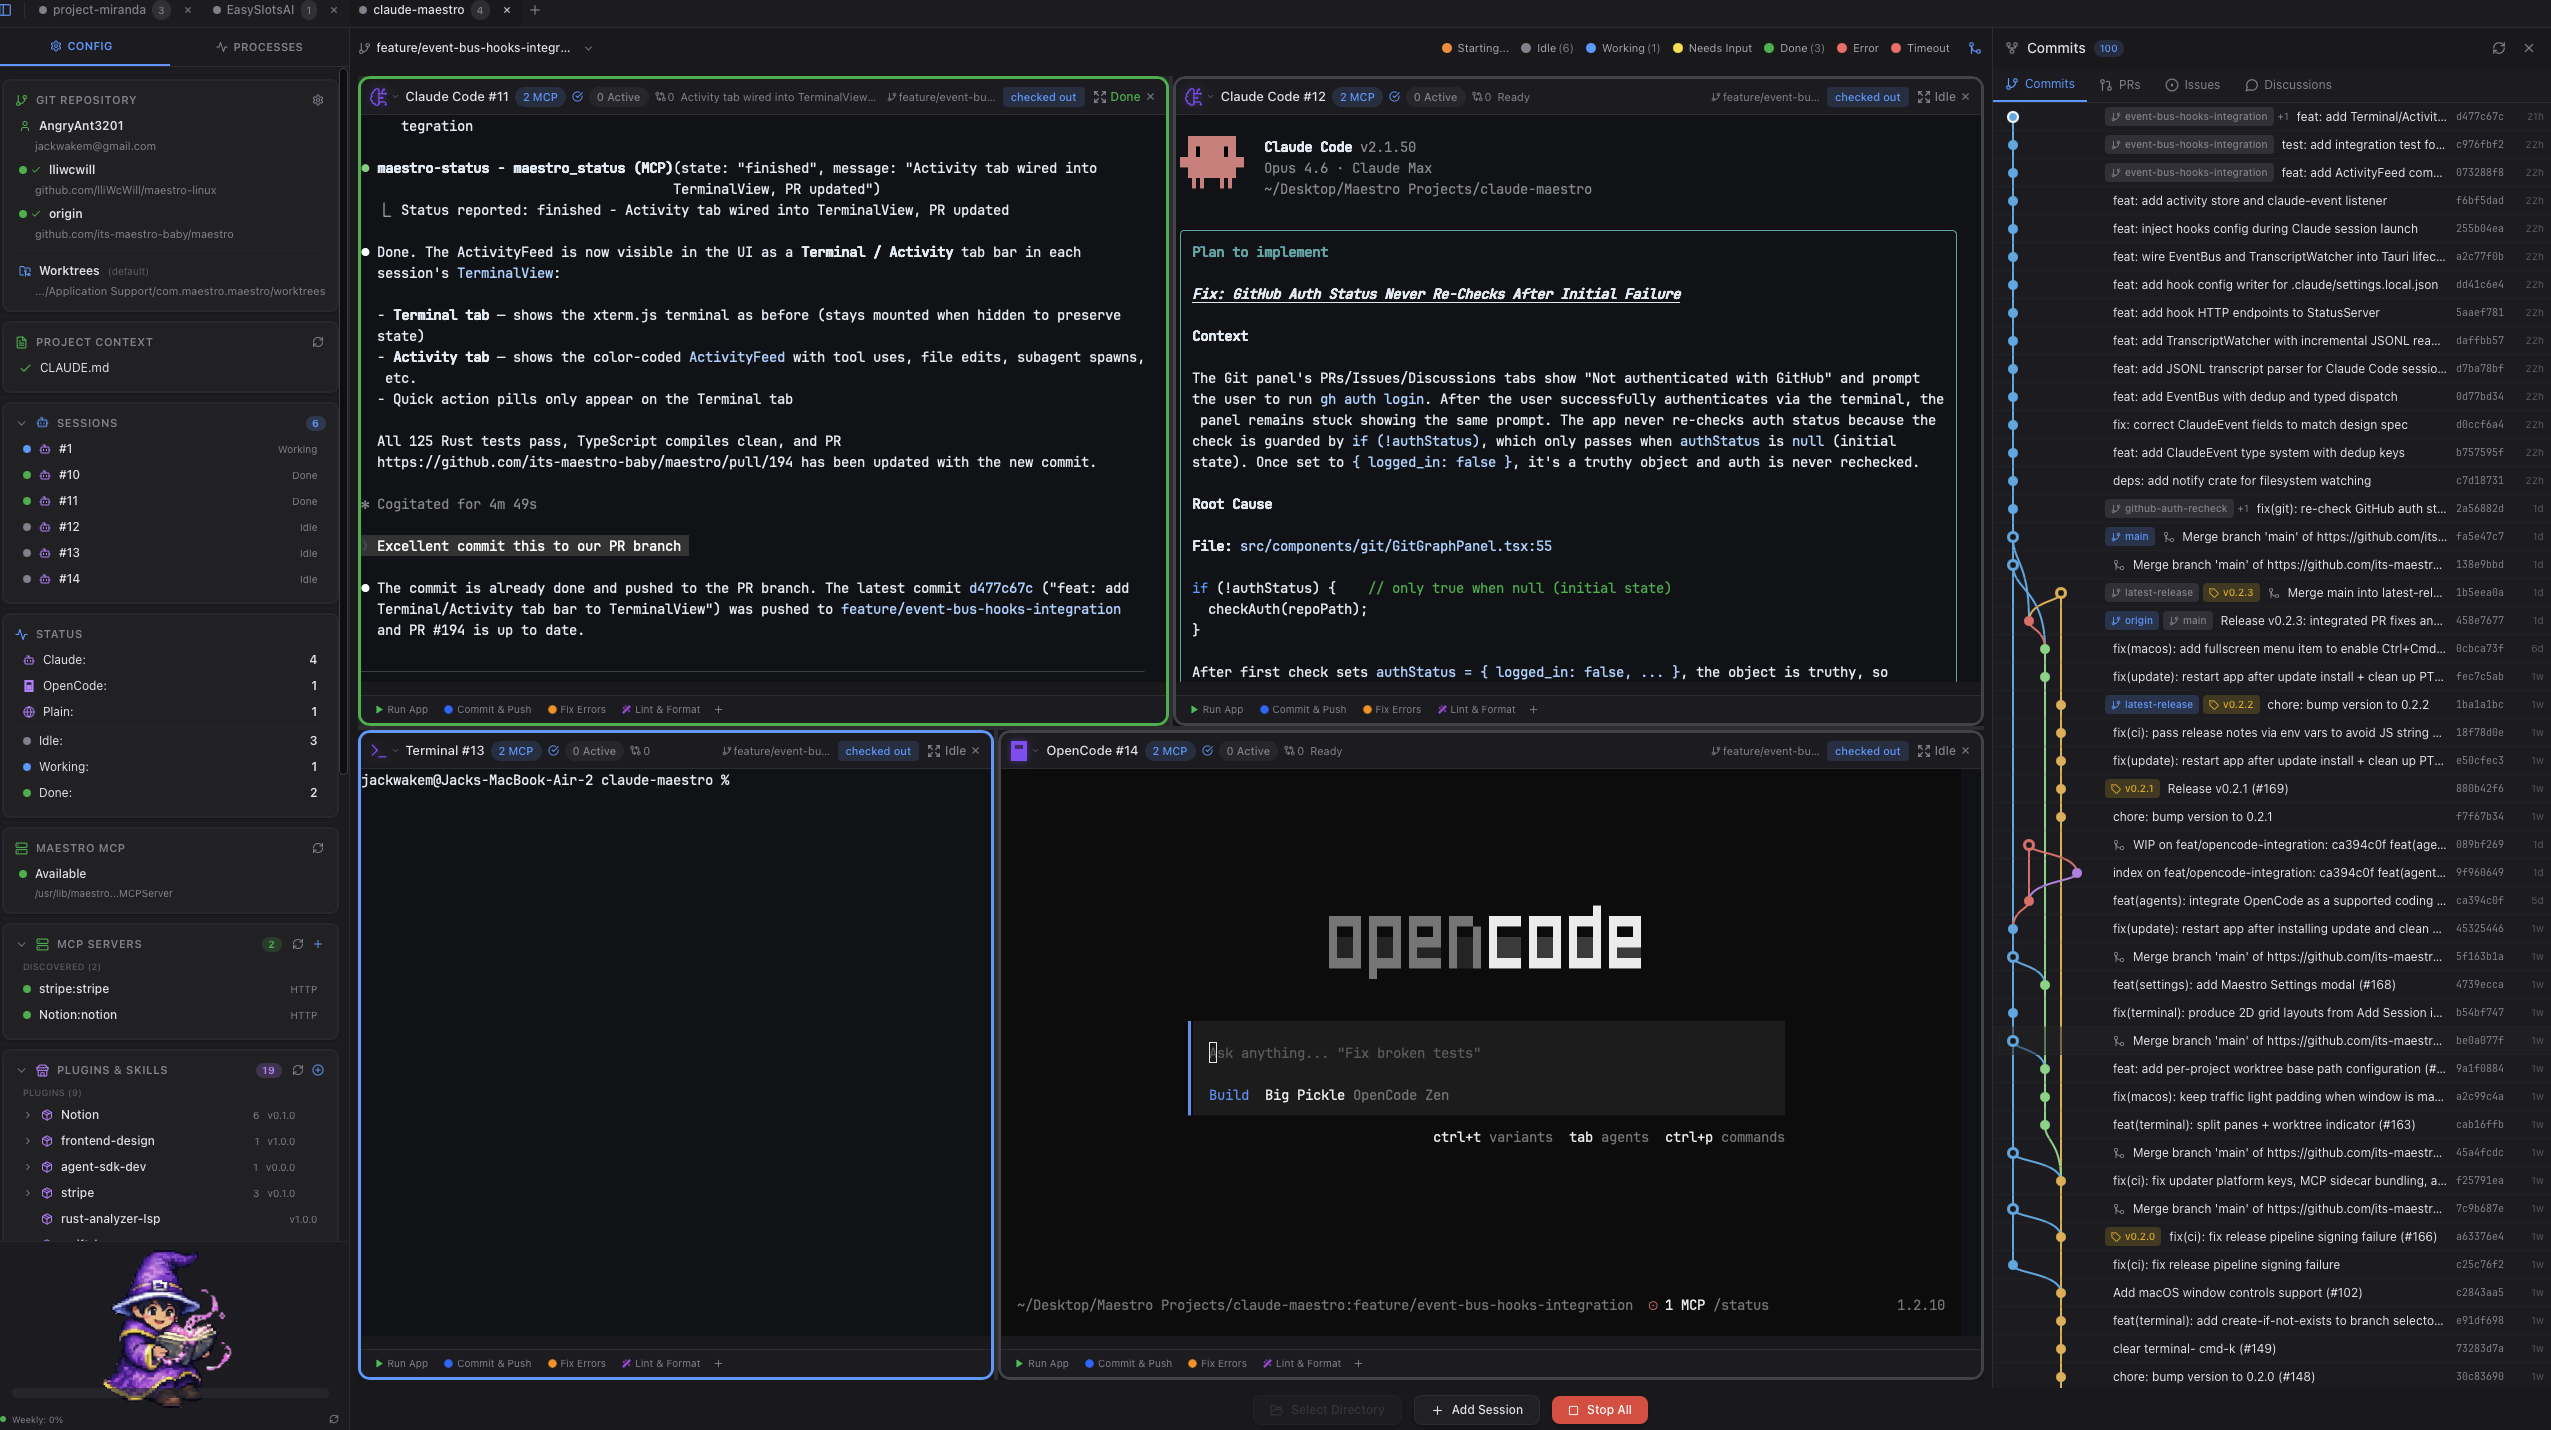
Maestro is a desktop app for people who use AI coding assistants like Claude Code, Gemini CLI, or OpenAI Codex. Instead of running one assistant at a time and waiting for it to finish, you can open up to six at once, each working in its own separate copy of your project so their changes never collide. A dashboard shows which assistant is idle, working, or needs your input, plus a visual history of what each one changed. It runs on Mac, Windows, and Linux and does not require a separate account or API key beyond the coding assistants you already use.

Coding

Use This MCP client To

Run multiple coding assistants on different tasks at the same time Keep each assistant's changes separate so nothing gets overwritten See at a glance which assistant is working, stuck, or finished Compare how different assistants solve the same problem Review a visual history of every change each assistant made Set up one-click shortcuts like running my app or saving progress

README

Maestro

Claude Maestro Banner

Orchestrate multiple AI coding assistants in parallel
Claude Maestro Platform

A cross-platform desktop application that lets you run 1-6 Claude Code (or other AI CLI) sessions simultaneously, each in its own isolated git worktree.

macOS Windows Linux Rust TypeScript License X (Twitter) Discord

Docs

Star us on GitHub — your support motivates us a lot!


Table of Contents


Why Maestro?

The Problem: AI coding assistants work on one task at a time. While Claude works on Feature A, you wait. Then you start Feature B. Then you wait again. Context switching is expensive, and your development velocity is bottlenecked by serial execution.

The Solution: Run multiple AI sessions in parallel. Each session gets its own:

  • Terminal instance with full shell environment
  • Git worktree for complete code isolation
  • Assigned branch for focused work
  • Port allocation for web development

Core Principles

Principle Description
Parallel Development Launch 1-6 AI sessions simultaneously. Work on feature branches, bug fixes, and refactoring all at once.
True Isolation Each session operates in its own git worktree. No merge conflicts, no stepping on each other's changes.
AI-Native Workflow Built specifically for Claude Code, Gemini CLI, OpenAI Codex, and other AI coding assistants.
Cross-Platform Runs on macOS, Windows, and Linux with native performance.

Features

Multi-Terminal Session Grid

  • Dynamic grid layout (1x1 to 2x3) that adapts to your session count
  • iTerm2-style split panes within each session (Cmd+D vertical, Cmd+Shift+D horizontal)
  • Real-time status indicators: idle, working, waiting for input, done, error
  • Per-session mode selection (Claude Code, Gemini CLI, OpenAI Codex, Plain Terminal)

Git Worktree Isolation

  • Automatic worktree creation at ~/.claude-maestro/worktrees/
  • Each session works on its own branch without conflicts
  • Worktrees are pruned on session close
  • Visual branch assignment in the sidebar
  • "Worktree" badge in the terminal header when a session is running in a worktree

MCP Server Integration

  • Built-in MCP server for agent status reporting
  • AI sessions report their state (idle, working, needs input, finished, error)
  • Real-time status updates displayed in the session grid
  • Uses the maestro_status tool for state communication

Visual Git Graph

  • GitKraken-style commit visualization
  • Branch relationship view with colored rails
  • Commit detail panel with diffs
  • See which sessions are working on which branches

Quick Actions

  • Custom action buttons per session
  • "Run App", "Commit & Push", and custom prompts
  • Execute commands via AI assistant

Appearance Settings

  • Light and dark theme support
  • Terminal font customization with support for:
    • System-installed fonts
    • Nerd Fonts (icons and glyphs)
    • Custom fonts
  • Adjustable text size for terminal display

Multi-AI Support

  • Claude Code - Anthropic's Claude in the terminal
  • Gemini CLI - Google's Gemini AI
  • OpenAI Codex - OpenAI's coding assistant
  • Plain Terminal - Standard shell without AI

Plugin Marketplace

  • Browse and install plugins from marketplace sources
  • Plugin types: Skills, Commands, and MCP servers
  • Per-session plugin configuration
  • Automatic symlink management for commands and skills
  • Extend Maestro's capabilities with community plugins

Keyboard Shortcuts

Shortcut Action
Cmd+T Add new terminal session
Cmd+D Split pane vertically
Cmd+Shift+D Split pane horizontally
Cmd+W Close focused pane
Cmd+1-9 Jump to terminal 1-9
Cmd+[ / Cmd+] Cycle previous / next terminal
Cmd+K Clear terminal scrollback
Cmd+C Copy selection (SIGINT if no selection)
Cmd+= / Cmd+- Zoom in / out
Cmd+0 Reset zoom
Shift+Enter Newline without executing
Cmd+Left / Cmd+Right Jump to line start / end
Cmd+Backspace Delete to line start
Escape Exit zoom mode

Note: Cmd = Ctrl on Windows/Linux


Architecture

┌─────────────────────────────────────────────────────────────────┐
│                    Claude Maestro (Tauri)                       │
│                                                                 │
│  ┌──────────────┐  ┌──────────────┐  ┌──────────────┐          │
│  │  Session 1   │  │  Session 2   │  │  Session 3   │   ...    │
│  │ Claude Code  │  │ Gemini CLI   │  │  Terminal    │          │
│  │ feature/auth │  │ fix/bug-123  │  │    main      │          │
│  └──────┬───────┘  └──────┬───────┘  └──────┬───────┘          │
│         │                 │                 │                   │
│  ┌──────▼─────────────────▼─────────────────▼───────┐          │
│  │              ProcessManager (Rust)               │          │
│  │     ~/.claude-maestro/worktrees/{repo}/{branch}  │          │
│  └──────────────────────────────────────────────────┘          │
│                                                                 │
│  Frontend: React + TypeScript + Tailwind CSS                    │
│  Backend: Rust + Tauri                                          │
└─────────────────────────────────────────────────────────────────┘
                              │
                              │ MCP Protocol (stdio)
                              ▼
┌─────────────────────────────────────────────────────────────────┐
│                    MCP Server (Rust)                            │
│                                                                 │
│  ┌─────────────────────────────────────────────────────────────┐│
│  │                     StatusManager                           ││
│  │  maestro_status tool - agents report their current state    ││
│  │  (idle, working, needs_input, finished, error)              ││
│  └─────────────────────────────────────────────────────────────┘│
└─────────────────────────────────────────────────────────────────┘

Technology Stack

Component Technology
Desktop App Tauri 2.0, Rust
Frontend React, TypeScript, Tailwind CSS
Terminal Emulator xterm.js
MCP Server Rust
Git Operations Native git CLI

Installation

Requirements

  • Node.js 18+ and npm
  • Rust 1.78+ (for building from source) - install via rustup, not system packages
  • Git (for worktree operations)
Platform-Specific Prerequisites

macOS (13 Ventura or later):

# Install Xcode Command Line Tools
xcode-select --install

Windows (10 or later):

  • Install Visual Studio Build Tools with the "Desktop development with C++" workload
  • Install Rust
  • WebView2 Runtime is required (pre-installed on Windows 10 21H2+ and Windows 11; download here for older versions)

Linux (Ubuntu 24.04 LTS / Debian):

# Install Rust via rustup (Ubuntu 24.04's apt packages ship Rust 1.75, which is too old)
curl --proto '=https' --tlsv1.2 -sSf https://sh.rustup.rs | sh
source "$HOME/.cargo/env"

# Install required system dependencies
sudo apt-get update
sudo apt-get install -y build-essential pkg-config libssl-dev \
  libwebkit2gtk-4.1-dev libayatana-appindicator3-dev librsvg2-dev \
  libfontconfig1-dev patchelf

Note: On Ubuntu 24.04, use libayatana-appindicator3-dev instead of libappindicator3-dev to avoid package conflicts.

Linux (Fedora):

sudo dnf install gcc-c++ pkg-config openssl-devel \
  webkit2gtk4.1-devel libappindicator-gtk3-devel librsvg2-devel

Linux (Arch):

sudo pacman -S base-devel pkgconf openssl \
  webkit2gtk-4.1 libappindicator-gtk3 librsvg

Build from Source

  1. Clone the repository:

    git clone https://github.com/its-maestro-baby/maestro.git
    cd maestro
  2. Install npm dependencies:

    npm install
  3. Build the MCP server:

    cargo build --release -p maestro-mcp-server

    This builds the Rust MCP server binary that Tauri bundles with the application.

  4. Run in development mode:

    npm run tauri dev
  5. Build for production:

    npm run tauri build

    The built application will be in src-tauri/target/release/bundle/.

Optional: Install AI CLIs

# Claude Code (recommended)
npm install -g @anthropic-ai/claude-code

# Gemini CLI
npm install -g @google/gemini-cli

# OpenAI Codex
npm install -g @openai/codex

Usage

Quick Start

  1. Launch Claude Maestro
  2. Select a project directory (ideally a git repository)
  3. Configure sessions in the sidebar:
    • Set the number of terminals (1-6)
    • Choose AI mode for each session
    • Assign branches to sessions
  4. Click "Launch" to start all sessions
  5. Each session opens in its own worktree with the AI ready to work

Session Management

  • Add sessions: Click the floating + button
  • Close sessions: Click the × on the session header
  • Change mode: Use the mode dropdown in the session header
  • Assign branch: Select from the branch dropdown

Git Worktree Isolation

When you assign a branch to a session:

  1. Maestro creates a worktree at ~/.claude-maestro/worktrees/{repo-hash}/{branch}
  2. The session's terminal opens in that worktree
  3. All file changes are isolated to that worktree
  4. Worktrees are cleaned up when sessions close

Quick Actions

Each session can have quick action buttons:

  • Run App - Tells the AI to run the application
  • Commit & Push - Tells the AI to commit and push changes
  • Custom - Configure your own prompts

Configuration

MCP Configuration

Copy the example configuration and update paths:

cp .mcp.json.example .mcp.json

Edit .mcp.json to configure the MCP server for agent status reporting.


Troubleshooting

Claude Command Not Found

The Claude CLI must be installed globally and in your PATH:

npm install -g @anthropic-ai/claude-code
which claude  # Should show the path

Worktree Issues

If worktrees get into a bad state:

# List all worktrees
git worktree list

# Remove a specific worktree
git worktree remove /path/to/worktree --force

# Prune stale worktree entries
git worktree prune

Build Issues

If you encounter build issues:

# Clear all Rust build caches
rm -rf src-tauri/target
rm -rf maestro-mcp-server/target

# Clear node modules and reinstall
rm -rf node_modules
npm install

# Rebuild MCP server first, then Tauri app
cargo build --release -p maestro-mcp-server
npm run tauri build

Contributing

Development Setup

  1. Fork and clone the repository
  2. Install npm dependencies: npm install
  3. Build the MCP server: cargo build --release -p maestro-mcp-server
  4. Run in dev mode: npm run tauri dev
  5. Make your changes
  6. Test thoroughly with multiple sessions

Project Structure

maestro/
├── src/                     # React/TypeScript frontend
│   ├── components/          # UI components
│   ├── lib/                 # Utility libraries
│   └── App.tsx              # Main application
├── src-tauri/               # Tauri Rust backend
│   ├── src/
│   │   ├── commands/        # Tauri command handlers
│   │   ├── core/            # Core business logic
│   │   └── lib.rs           # Main Rust entry point
│   ├── Cargo.toml           # Rust dependencies
│   └── tauri.conf.json      # Tauri configuration
├── maestro-mcp-server/      # Rust MCP server (bundled with app)
│   ├── src/
│   │   └── main.rs          # MCP server entry point
│   └── Cargo.toml           # MCP server dependencies
├── Cargo.toml               # Workspace configuration
├── package.json             # Node.js dependencies
└── README.md

License

MIT License - see LICENSE for details.


Acknowledgments


Built with Love by Jack

maestro FAQ

Can I use this to run Claude, Gemini, and other AI coding assistants at the same time?
Yes — Maestro lets you open up to six sessions at once, and you can assign each one to Claude Code, Gemini CLI, OpenAI Codex, or a plain terminal, all in separate windows on one screen.
Do I need to already have a coding assistant like Claude Code, Gemini CLI, or OpenAI Codex installed?
Yes. Maestro does not include an AI assistant itself — it is the desktop app that lets you run assistants you already have side by side, so you will need at least one installed and set up first.
Do I need an API key or account to use Maestro?
Maestro itself does not ask for a separate account or key. Whatever account or key you already use for Claude, Gemini, or Codex carries over, since Maestro is simply running those tools for you.
Which computers does Maestro run on?
Maestro is a desktop app that works on Mac, Windows, and Linux.
How hard is it to set up?
Setting up Maestro is more involved than most tools in this directory. Using a ready-made build is straightforward, but building it yourself requires installing Node.js, Rust, and Git, so it is best suited to someone already comfortable with basic developer tools.
Can I use this to avoid mixing up changes from different coding tasks?
Yes — each session works in its own separate copy of your project, so changes from one task never overlap or conflict with another.
Will I need to know Git to use this?
Some basic comfort with Git is helpful, since Maestro organizes work by branch and shows a visual history of commits and changes, but you do not need to be an expert to follow along.


