aseprite-mcp

MCP.Pizza Chef: diivi

This server drives Aseprite, the pixel-art editor, directly from a conversation. It offers more than a hundred drawing and animation commands: canvas setup, layers, shading ramps, dithering, retro palettes, tweened frames, and tilemaps, plus preview renders so the assistant can look at its own work and fix it before exporting to PNG, GIF, or a sprite sheet. You need Aseprite installed on your own machine along with Python and the uv tool. Nothing needs to be paid for beyond Aseprite itself.

Images/Design

Use This MCP server To

Draw a 32x32 pixel-art character from a short description Animate a four-frame sword swing and export it as a GIF Recolor a sprite into a retro Game Boy palette Add an outline and drop shadow to a title label Export every animation tag as its own sprite sheet Check my own frames side by side before exporting

README

Aseprite MCP Tools

A Python MCP server that gives AI assistants full control over Aseprite for creating pixel art and animated sprites.

104 tools across 17 categories — canvas, drawing, layers, animation, palettes, effects, slices, tilemaps, exports, visual-feedback/analysis tools, and a raw Lua escape hatch. The tool set is designed so an LLM has everything it needs to produce good pixel art, not just primitives: shading ramps with hue shifting, ordered dithering, outlines, retro palette presets with quantization, onion-skin renders, and frame diffing for animation work.
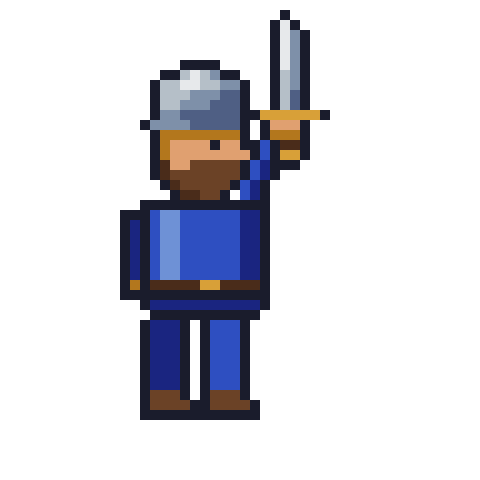
Example: a swordsman, drawn and animated by Claude

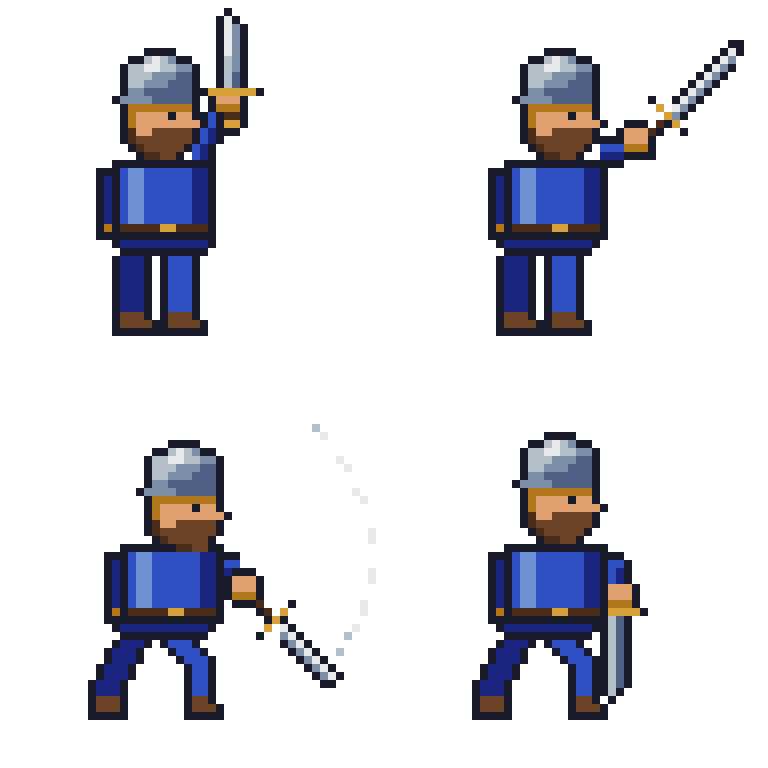
Pixel-art swordsman drawn by Claude Fable 5 4-frame sword slash animation by Claude Fable 5
Task 1"Draw me a pixel art of a swordsman."
32×32 still, exported at 10×.
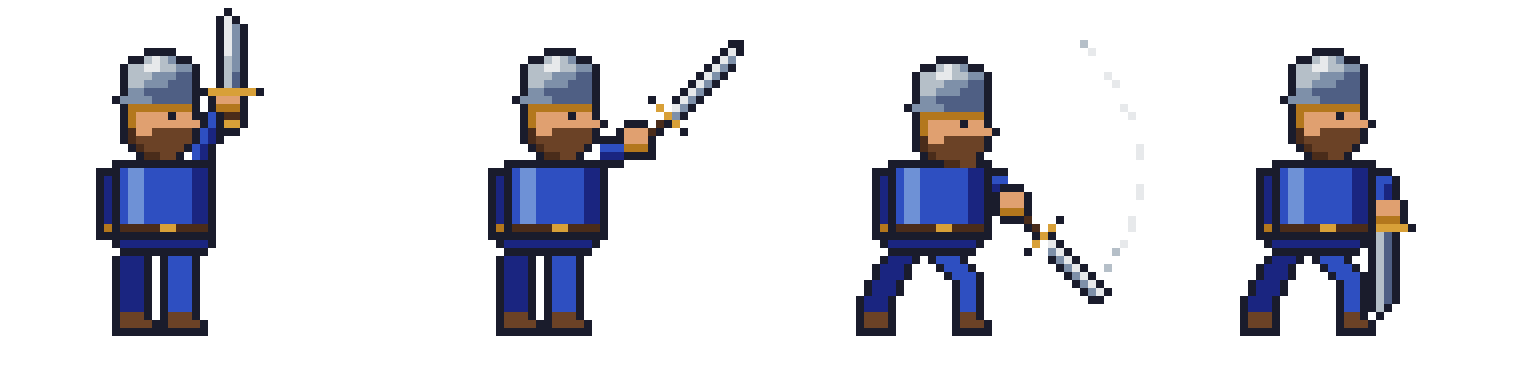
Task 2"…a sword slash attack sequence, from windup to follow-through."
4-frame animation, exported with export_tag.
Slash sequence spritesheet: windup, extension, swing, follow-through
The same slash as a spritesheet (export_spritesheet): windup → extension → swing → follow-through.

Both were created end-to-end by Claude Fable 5 through this server's MCP tools — drawing, checking its own work with scaled export_frame previews and render_onion_skin, then exporting. The tasks recreate the benchmark from Draw Me a Swordsman by Lj Miranda, whose findings inspired this server's expanded toolset.

Tool Categories

Category Tools Description
Canvas 6 Create sprites, manage layers/frames, set the active state
Drawing 14 Pixels, lines, rectangles, circles, ellipses, polygons, paths, fills, gradients
Text 3 Draw and measure text with bitmap sprite-sheet or TrueType fonts
Layers 7 Delete, rename, duplicate, reorder, blend modes, merge, flatten
Selection & Regions 4 Move, copy, and erase rectangular regions or colors
Effects 5 Outlines, color replacement, HSL adjustment, ordered dithering
Animation 24 Frames, cels, tags, tweening with easing, propagation
Palette 8 Get/set palettes, retro presets, color ramps, quantization, color modes
Transform 4 Flip, rotate, resize, crop
Slices 5 Named regions, 9-patch centers, pivot points
Tilemap 5 Tilemap layers, tileset editing, tile placement
Export & Import 7 PNG, GIF, sprite sheets, per-layer/per-tag export, image import
Inspection 3 Read pixels and sprite metadata
Analysis & Visual Feedback 3 Onion-skin renders, frame diffing, color statistics
Quality 4 Validate and sanitize animation consistency
Scene 1 Copy layers between sprite files
Preview & Guide 3 Local HTTP preview server, workflow guide
Scripting 1 Raw Lua escape hatch for anything not covered above

Canvas

Tool Description
create_canvas Create a new sprite with the given dimensions
add_layer Add a new layer, optionally inside a named group
add_group Add a new (optionally nested) group layer
add_frame Append a new frame
set_frame Set the active frame
set_frame_duration Set one frame's duration in ms
set_layer Set the active layer (optionally creating it)

Drawing

All _at variants target a specific layer/frame and can create the cel on demand. Coordinates are sprite-global.

Tool Description
draw_pixels Plot individual pixels with per-pixel colors
draw_pixels_at Plot pixels on a specific layer/frame
draw_line / draw_line_at Lines with thickness
draw_rectangle / draw_rectangle_at Outlined or filled rectangles
draw_circle / draw_circle_at Outlined or filled circles
draw_ellipse_at Outlined or filled ellipses with separate x/y radii
draw_polygon Outlined or filled polygons from a point list
draw_path Polyline through a point list with thickness
fill_area / fill_area_at Paint-bucket flood fill
apply_gradient_rect Smooth linear gradient fill in a rectangle

Text

Aseprite's Lua API has no text drawing, so glyphs are rasterised on the server and composited into the sprite. Two font backends are supported: bitmap sprite-sheet fonts (the right choice for pixel art — glyphs are already pixels and size scales them by whole numbers) and TrueType .ttf/.otf files, rendered without antialiasing unless you ask for it.

Fonts are discovered in ~/.aseprite-mcp/fonts: a bitmap font is a directory containing font.json plus its sheet PNGs; a TrueType font is just the font file. Installed system fonts are listed too. font also accepts a direct path.

Tool Description
list_text_fonts List the bitmap and TrueType fonts available to draw_text
measure_text Width, height, advance and baseline extents — size a panel or centre a label without redrawing to find out
draw_text Draw text with anchors, faux bold, outline, drop shadow and letter spacing

Call measure_text first when the layout depends on the text: it returns the same metrics draw_text will use, so a label can be centred or a plate sized in one pass.

measure_text(text="MODERATOR", font="minecraft", size=2, bold=1)
  -> width=115 height=15 advance_width=117 above_baseline=14 below_baseline=1 left_bearing=0

draw_text(filename="badge.aseprite", text="MODERATOR", x=64, y=17,
          font="minecraft", size=2, anchor="baseline", bold=1,
          color="#FFFFFF", shadow_color="#14237A")

Anchors are topleft/top/topright, left/center/right, bottomleft/bottom/bottomright, plus baselineleft/baseline/baselineright for pinning several labels to one baseline. Outline and shadow grow the stamp but never move the glyphs.

font.json
{
  "name": "my-font",
  "letter_gap": 1,
  "space_width": 3,
  "sheets": [{
    "file": "sheet.png",
    "cell_w": 8, "cell_h": 8,
    "ascent": 7,
    "chars": [" !\"#$%&'()*+,-./", "0123456789:;<=>?"]
  }],
  "overrides": {
    "86": {"ascent": 7, "rows": ["#...#", "#...#", ".#.#.", "..#.."]}
  }
}

Each sheet carries its own ascent, so sheets with different cell sizes still share a baseline — that is how a compact ASCII sheet and a taller accented sheet combine into one run. origin shifts the cell grid when the sheet has a margin, ink_rule: "dark" reads sheets that use an opaque white background to delimit variable-width glyph boxes, and advance: "box" takes the advance from the box rather than the ink. overrides replaces individual glyphs with hand-drawn rows, which is useful when a sheet ships a glyph that is off-centre or too tall to sit on the line.

Layers

Tool Description
delete_layer Delete a layer by name
rename_layer Rename a layer
duplicate_layer Duplicate a layer with all cels, opacity, and blend mode, optionally into a group
reorder_layer Move a layer to a position in the stack
set_layer_blend_mode Set blend mode (multiply, screen, overlay, ... 19 modes)
merge_layer_down Merge a layer into the one below it
flatten_sprite Flatten all layers into one

Selection & Regions

Tool Description
move_region Cut a rectangle of pixels and paste it elsewhere
copy_region Copy a rectangle to another position, layer, or frame
erase_region Make a rectangle transparent
erase_color Magic-eraser: make all pixels of a color transparent (with tolerance)

Effects

The pixel-art toolbox: clean outlines, palette-respecting blends, and shading variants.

Tool Description
outline_cel Add a 1px outline around all opaque pixels
replace_color Replace one color with another (with tolerance), preserving alpha
adjust_hsl Shift hue/saturation/lightness of a cel — palette swaps, night scenes, shadows
apply_dither_gradient Two-color gradient using Bayer 4×4 ordered dithering
apply_dither_pattern Uniform dithered mix of two colors at a given density

Animation

Tool Description
add_frames Append N frames with optional duration
delete_frame Delete a frame
set_frame_duration_all Set every frame's duration
duplicate_frame_range Duplicate a frame range N times
copy_frame / propagate_frame_to_range Copy all cels of a frame to other frames
create_cel / clear_cel / copy_cel Cel lifecycle on a layer/frame
propagate_cels Copy selected layers' cels across a frame range
set_cel_position Place a cel at x,y
set_cel_opacity Set a single cel's opacity
offset_cel_positions Shift cels by a delta across frames
tween_cel_positions Linear position tween across frames
tween_cel_positions_eased Position tween with easing (ease_in/out, smoothstep)
tween_cel_opacity_eased Opacity tween with easing
tween_cel_scale_eased Scale tween with easing and anchor
oscillate_cel_positions Sine-wave motion (bobbing, breathing, hovering)
set_tag / delete_tag Animation tags with direction (forward/reverse/pingpong)
set_layer_visibility / set_layer_opacity Layer-level visibility and opacity
set_onion_skin Configure onion-skin UI prefs (see render_onion_skin for batch use)
get_sprite_info Sprite metadata: size, layers, frames, durations, tags

Palette

Tool Description
get_palette Read the palette as hex colors
set_palette Set the palette from a list of hex colors
list_palette_presets List built-in retro palettes
apply_palette_preset Apply a preset: gameboy, pico8, c64, cga, dawnbringer16, dawnbringer32, grayscale_4, monochrome
generate_color_ramp Build a dark→light shading ramp with hue shifting from a base color
quantize_to_palette Snap every pixel to the nearest palette color
remap_colors_in_cel_range Remap specific colors across a frame range
set_color_mode Convert between RGB, grayscale, and indexed

Transform

Tool Description
flip_layer Flip a cel horizontally or vertically
rotate_layer Rotate a cel 90/180/270°
resize_canvas Scale the sprite to new dimensions
crop_canvas Crop to a rectangle

Slices

Tool Description
create_slice Create a named rectangular region
set_slice_center Set the 9-patch stretchable center
set_slice_pivot Set the pivot point
list_slices List all slices with bounds, centers, pivots as JSON
delete_slice Delete a slice

Tilemap

Tool Description
create_tilemap_layer Add a tilemap layer with its own tileset and tile grid
draw_on_tile Paint pixels into a tileset tile (auto-appends new tiles)
set_tiles Place tiles on the map by grid position
get_tile_at Read which tile occupies a grid cell
get_tilemap_info Tile size, tile count, and map dimensions as JSON

Export & Import

Tool Description
export_sprite Export to PNG, GIF, JPG, ...
export_frame Export one frame as PNG with integer upscaling — the core visual-feedback loop: draw, export at 8×, look, iterate
export_spritesheet Sprite sheet (horizontal/vertical/rows/columns/packed) with optional JSON metadata and per-tag filtering
export_layers One PNG per layer
export_tag Export an animation tag as GIF or PNG sequence
import_image_as_layer Import a PNG into a layer (references, premade parts)
copy_sprite Duplicate the .aseprite file

Inspection

Tool Description
get_pixel_color Read one pixel's RGBA
get_pixels_rect Read a rectangle of pixels as JSON
get_sprite_info Sprite metadata (also listed under Animation)

Analysis & Visual Feedback

Batch-mode equivalents of what a human artist gets from the Aseprite UI.

Tool Description
render_onion_skin Render a frame over translucent ghosts of neighboring frames — check motion continuity without opening Aseprite
compare_frames Diff two frames: changed pixel count, percentage, bounding box
get_color_stats Color histogram of a frame — catches palette drift and near-duplicate colors

Quality

Tool Description
ensure_layers_present Create missing cels for layers across a frame range
validate_scene Report missing layers/cels as JSON
audit_animation Audit frames for overlaps and out-of-range layer activity
animation_sanitize Normalize layer order, coverage, and overlaps

Scene

Tool Description
copy_layers_between_sprites Copy layers by name from one .aseprite file to another

Preview & Guide

Tool Description
start_preview_server / stop_preview_server Serve exported files over local HTTP
animation_workflow_guide Returns a step-by-step workflow guide for the LLM

Scripting

Tool Description
run_lua_script Execute arbitrary Aseprite Lua (API docs) in batch mode. The escape hatch when no dedicated tool fits: one script can batch many operations into a single Aseprite launch. Remember to spr:saveAs(spr.filename) and print() your results. ⚠️ Runs unrestricted code on the host — only pass scripts you trust.

Recommended Workflow for LLMs

  1. Plan the palette first: generate_color_ramp for each material (skin, armor, blade), or apply_palette_preset for a retro look.
  2. Build in layers: background / body / equipment / effects, so parts can be animated and edited independently.
  3. Draw coarse to fine: silhouette with draw_rectangle_at / draw_ellipse_at / fill_area_at, then refine with draw_pixels_at.
  4. Look at your work: export_frame at 8×, inspect, fix, repeat. Use get_color_stats to keep the palette tight.
  5. Shade with intent: adjust_hsl for shadow layers, apply_dither_gradient for blends, outline_cel for readability.
  6. Animate with the cel tools: propagate_cels, then tween_cel_positions_eased / oscillate_cel_positions; verify with render_onion_skin and compare_frames; export with export_tag.

Docker Usage

Quick Start

Build and run the Docker image:

docker build -t aseprite-mcp:latest .
docker run -it --rm aseprite-mcp:latest

Or use the provided build scripts:

  • Linux/macOS: chmod +x build-docker.sh && ./build-docker.sh
  • Windows: .\build-docker.ps1

Using Docker Compose

# Production
docker-compose up aseprite-mcp

# Development mode
docker-compose --profile dev up aseprite-mcp-dev

See DOCKER.md for detailed Docker setup instructions.

Optional: Install Aseprite via Steam

To have the container install Aseprite via SteamCMD at startup, provide Steam credentials:

# Create a .env with STEAM_USERNAME/STEAM_PASSWORD (and optional STEAM_GUARD_CODE)
# Then
docker run --rm -i --env-file .env aseprite-mcp:latest

If installed, the binary will be at /opt/steamapps/common/Aseprite/aseprite and ASEPRITE_PATH will be picked up automatically.

Local Installation

Prerequisites

  • Python 3.13+
  • uv package manager
  • Aseprite (set ASEPRITE_PATH in .env if it is not on your PATH)

Installation:

{
  "mcpServers": {
      "aseprite": {
          "command": "/opt/homebrew/bin/uv",
          "args": [
              "--directory",
              "/path/to/repo",
              "run",
              "-m",
              "aseprite_mcp"
          ]
      }
  }
}

aseprite-mcp FAQ

Is this still being kept up to date?
Yes. It was last updated at the end of July 2026 and is actively maintained.
Do I need to buy Aseprite first?
Yes. Aseprite is paid software and has to already be installed on your computer for any of this to work.
Can I use this to make a walk-cycle animation?
Yes. It can add frames, tween between them, and show you onion-skin previews before exporting.
Do I need to sign up for anything or pay for a key?
No. Everything runs locally against your own copy of Aseprite, so there is nothing extra to sign up for.
How hard is setup?
It is aimed at people comfortable with a terminal. You install Python 3.13 and the uv tool, then point the server at Aseprite.