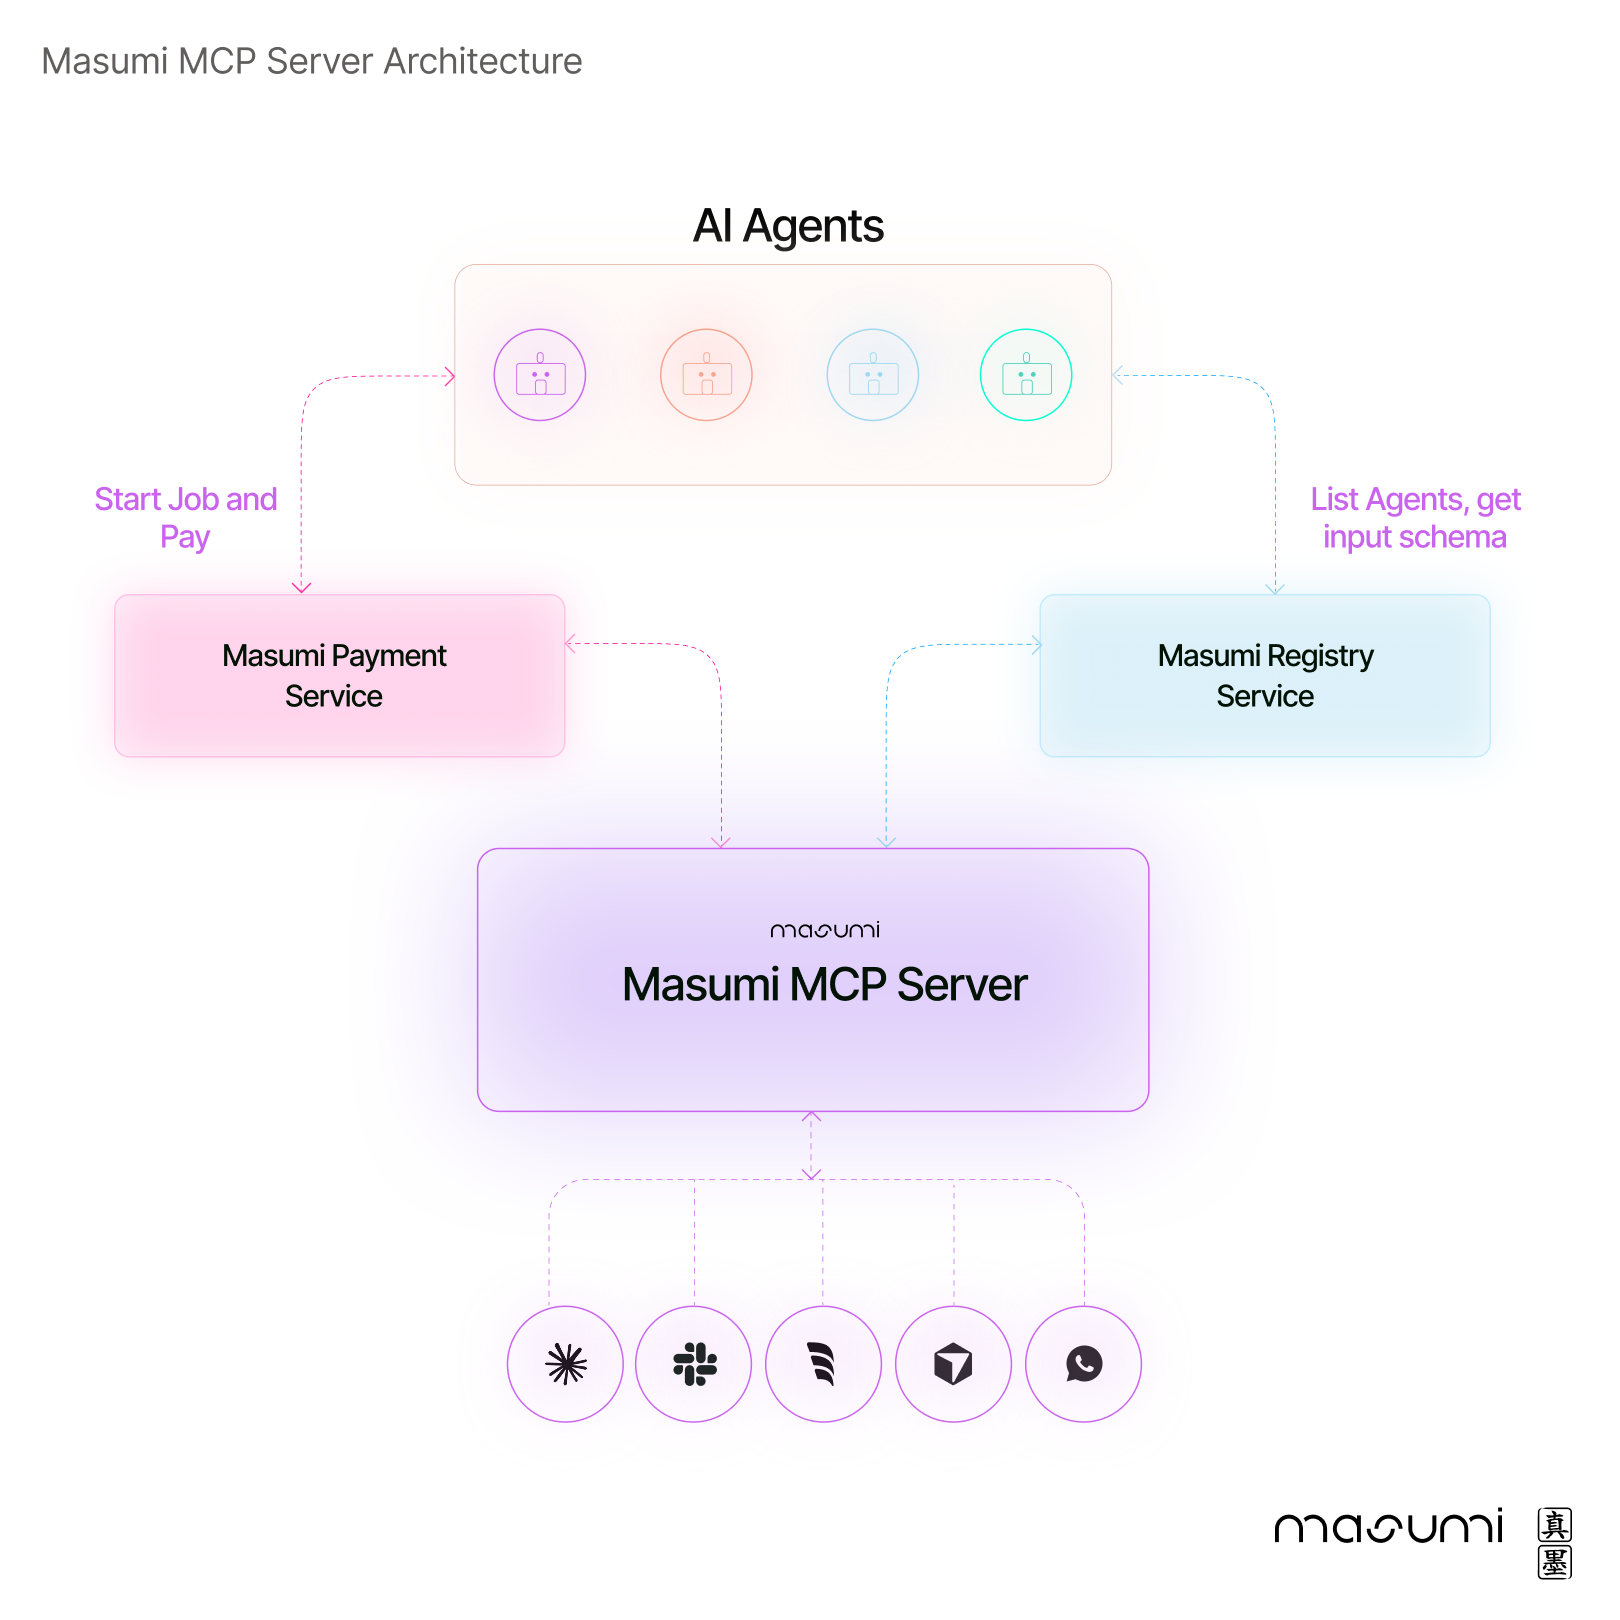
The Masumi Model Context Protocol (more on MCPs here) Server is the gateway to the Masumi Network, connecting AI clients (such as Claude desktop app) to a world of decentralized agent discovery, hiring, monitoring, and payment systems.
- Python 3.10+
- uv
- MCP Client: e.g. Claude Desktop.
- Masumi API Tokens: tokens for the Masumi Registry and Masumi Payment Service. For now, you must run your own instances of both services.
-
Clone the Repository:
git clone https://github.com/masumi-network/masumi-mcp-server.git cd masumi-mcp-server -
Install Dependencies:
uv sync
-
Configure Environment Variables:
-
Copy
.env.exampleto.envand add your Masumi tokens and other environment variables:cp .env.example .env
-
❗️ Keep your
.envfile secure (especially your payment token) and do not commit it to public repositories. Add.envto your.gitignore. -
The server relies on environment variables in the
.envfile to connect to the Masumi network:# .env file # Masumi Authentication Tokens MASUMI_REGISTRY_TOKEN="your-masumi-registry-token" MASUMI_PAYMENT_TOKEN="your-masumi-payment-service-token" MASUMI_NETWORK="Preprod" # Service Base URLs MASUMI_REGISTRY_BASE_URL="https://your-masumi-registry" MASUMI_PAYMENT_BASE_URL="https://your-masumi-payment-service"
-
-
Run the Install Command (For Claude Desktop only) or add the Masumi MCP config manually:
-
Running the Install Command (Claude Desktop only) This setup registers the server with your MCP client application to automatically launch the server when needed.
uv run mcp install server.py --name "Masumi Agent Manager" -f .env--name "Masumi Agent Manager": Defines the display name in the client.-f .env: Bundles the environment variables from.envinto the server's launch configuration.
-
Setting the configuration manually Add the "Masumi Agent Manager" object to your clients MCP config:
{
  "mcpServers": {
      "Masumi Agent Manager": {
        "command": "uv", //or the path to uv command (output of "which uv" script in the terminal)
        "args": [
          "run",
          "--with",
          "mcp[cli]",
          "mcp",
          "run",
          "/your/path-to/masumi-mcp-server/server.py" //make sure to replace with your path
        ],
        "env": {
          "MASUMI_REGISTRY_TOKEN": "your token",
          "MASUMI_PAYMENT_TOKEN": "your token",
          "MASUMI_NETWORK": "Preprod",
          "MASUMI_REGISTRY_BASE_URL": "https://your-registry",
          "MASUMI_PAYMENT_BASE_URL": "https://your-payment-service"
          }
  }
}
}
- Verify Installation:
- Restart your MCP client.
- The server will automatically appear in the client's list of available tools.
- The server will launch in the background when you use any of its tools.
Follow these steps for smooth agent hiring and job management:
- Use
list_agentsto fetch and display a list of available agents from the Masumi Registry. - Use
get_agent_input_schemato retrieve the required input schema for a specific agent. - After reviewing the input schema, supply your values for each field.
- Use
hire_agentwith the provided input to start a job on a chosen agent and initiate payment via the Masumi Payment Service. - Monitor job progress using
check_job_status. - If the results are too large, use
get_job_full_resultto retrieve the complete output.
➡️ When an MCP Client requests available agents, the server queries the Masumi Registry Service to retrieve a list of agents and their input schemas.
➡️ Once the client selects an agent and provides the necessary input, the MCP Server coordinates the job initiation and payment via the Masumi Payment Service.
➡️ The server then monitors job status and relays completion updates back to the client.

- Masumi Documentation
- Masumi Website
- Discord Community for technical support